Originals WTF? La Culture Geekery WWJD? The South Blog

Get Water Heater Switch... Save Planet.

Thought provoking content you're going to LOVE!

Postby Liv » Tue Jul 20, 2010 4:53 pm

on_off_light_switch_water_heater_eco.jpg
on_off_light_switch_water_heater_eco.jpg (152.98 KiB) Viewed 7008 times


[UPDATED]
While I hated the remake, one line from the new Karate Kid was this line in reference to the normality of water heater switches abroad and America's addiction with power:

"Get switch ... Save planet," mumbles Mr. Han (Jackie Chan)


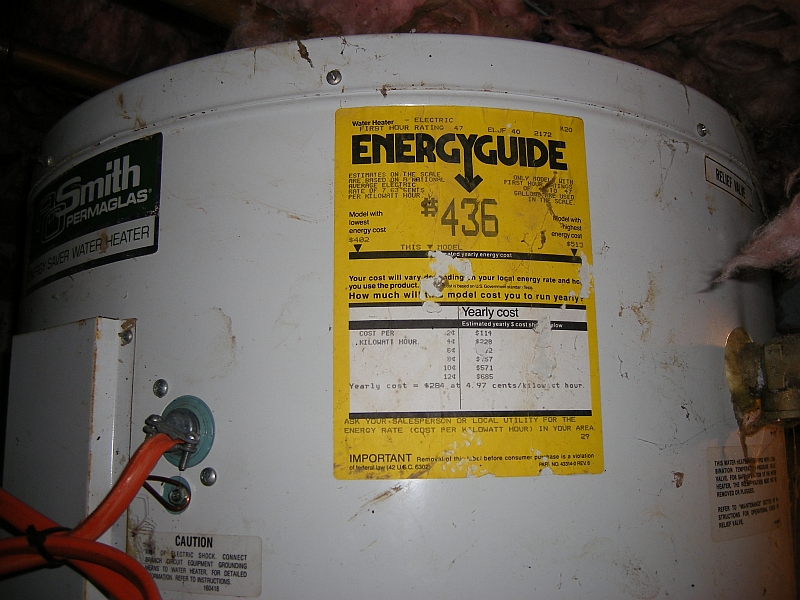
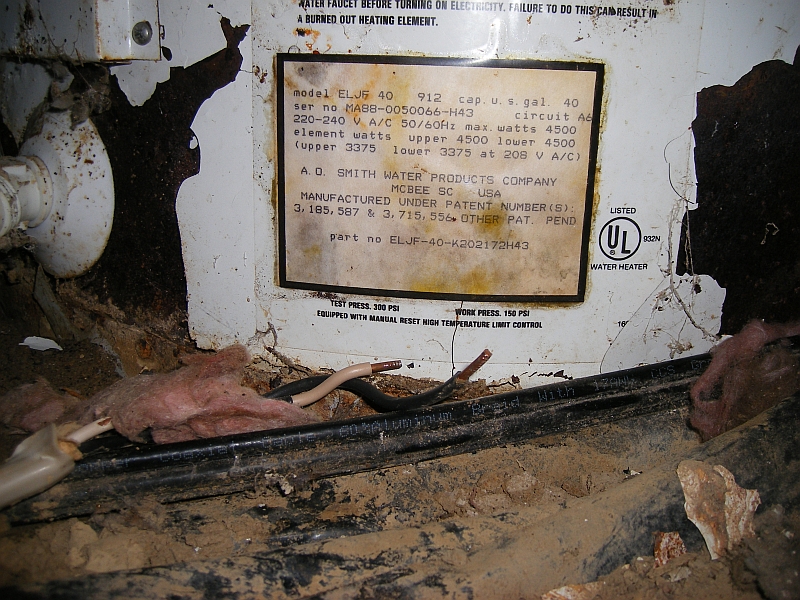
Why install a on/off switch or timer to your water heater? Well for about $50 in parts you can save up to 30% of your power bill each month. I chose the switch because it costs $10, compared to a timer which is $100. A few months back while under the house I did some recon. My water heater which is currently wired directly is Energy Guide rated at $436 a year. Unfortunately I don't think it gets even close to that anymore. It's two decades old and the outer metal casing is showing severe signs of rusting.

Image

    Parts you need to add a switch to your water heater:
    1) 1 30 Amp DPST light Switch from Home Depot ($10.00)
    2) 1 Light switch electrical box. ($2.00)
    3) 30 Amp electrical conduit. ($25-$50 depending on where you mount the switch)
    4) 1 stud mountable electrical conduit box with cover.($6.00)
    5) Wire caps ($1.00)
    6) Conduit nails ($3.00)

    Tools:
    1) Screwdrivers.
    2) Wire cutters.
    3) Hammer.
    4) Drill and large long bit.
    5) Other various tools depending on where you mount the switch.

    Quick Note: Something I didn't realize when I ripped out the drywall to install a switch is that they do make special switch boxes that mount on the outside of the drywall. This could be an excellent option instead of flush mounting the internal switch.

    Image

    How to Install a switch on the water heater.

    1) I didn't happen to capture photos of the switch install, but in my case I found my stud where I wanted to mount it. (He was very elusive.) Cut out the drywall, and mounted the switch box to the stud. Then I made another hole near the floor and drilled two large holes in the floor down into the crawl space. I then routed two cuts of power conduit through the holes into the switch. and wired it all in. Later I patched the wall with plaster and sanded, ready for paint.

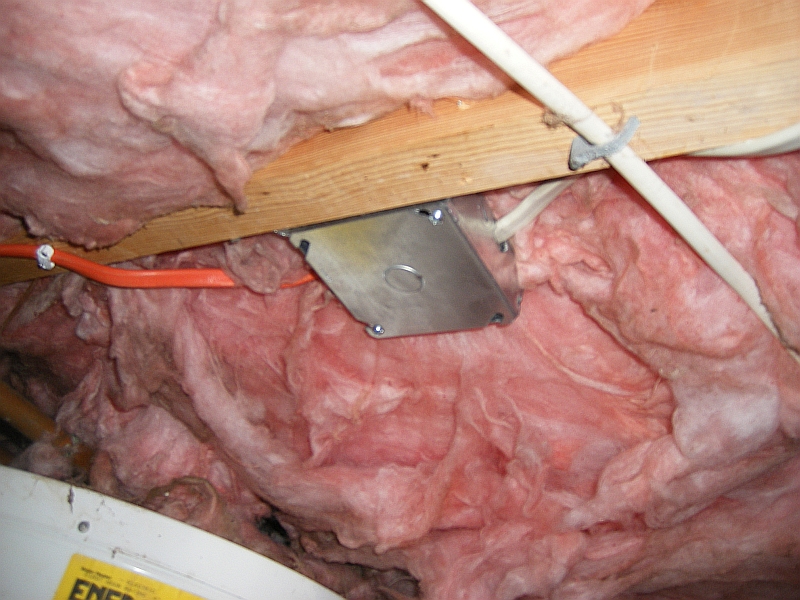
    2) With your switch wired and two runs of conduit running down to the water heater it's time to mount your metal conduit box on the stud, and tack the wires partially down. Two nails hold the box to the stud, and some careful hammering without taking out your water main should suffice.

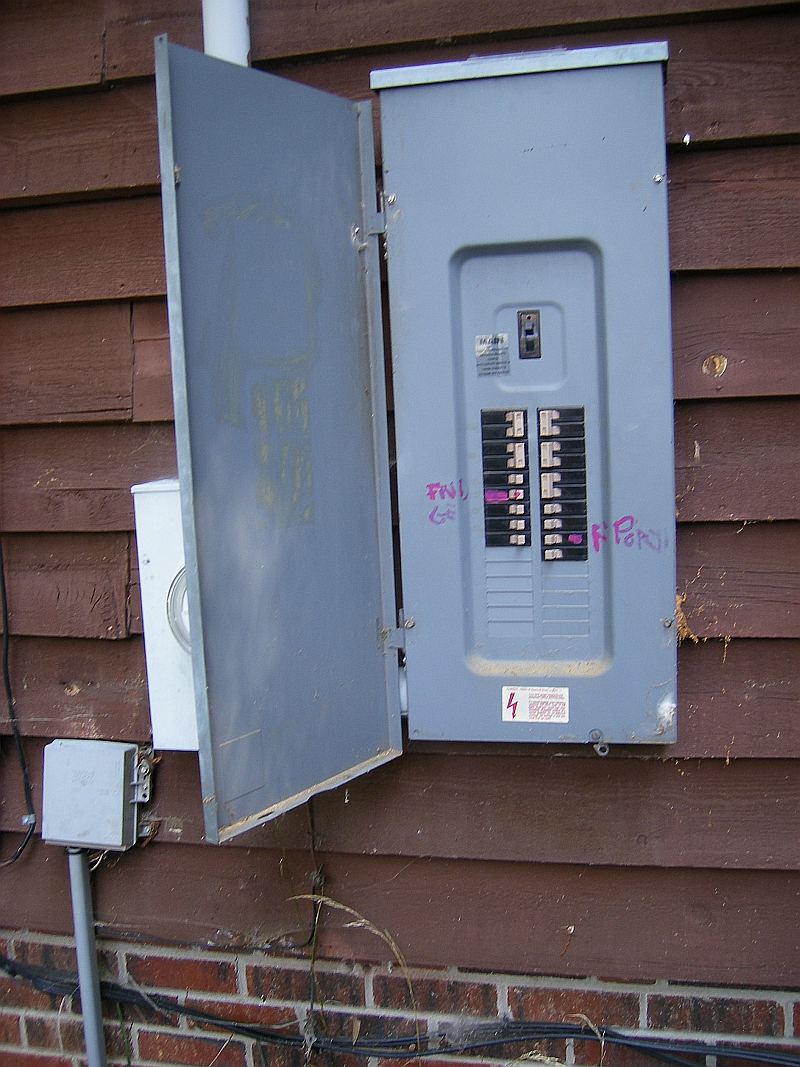
    3) Now is the time to find your power box and shut off all the power to your house so you don't get electrocuted.
    Image

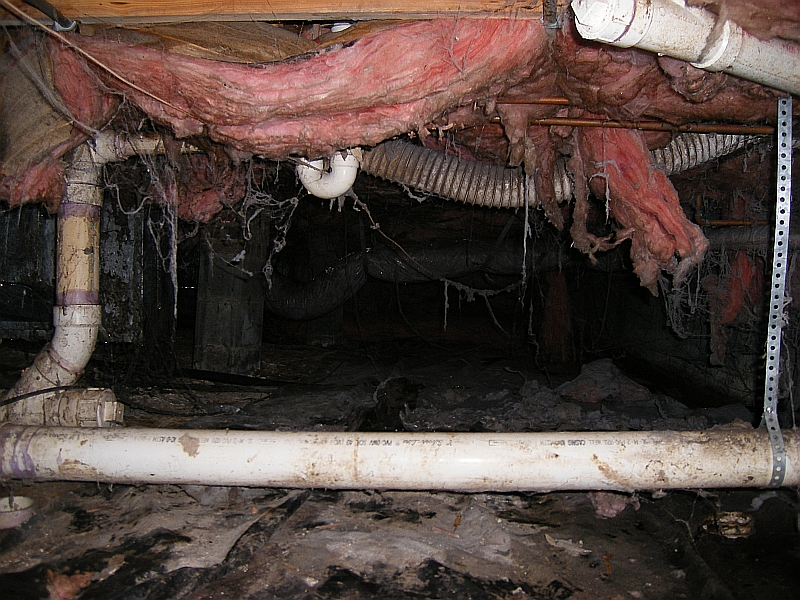
    4) Next find your flashlight and your gumption because it's time to go to back to the place you just were. A place that gets more scary with no lights... Your crawl space access.

    Image

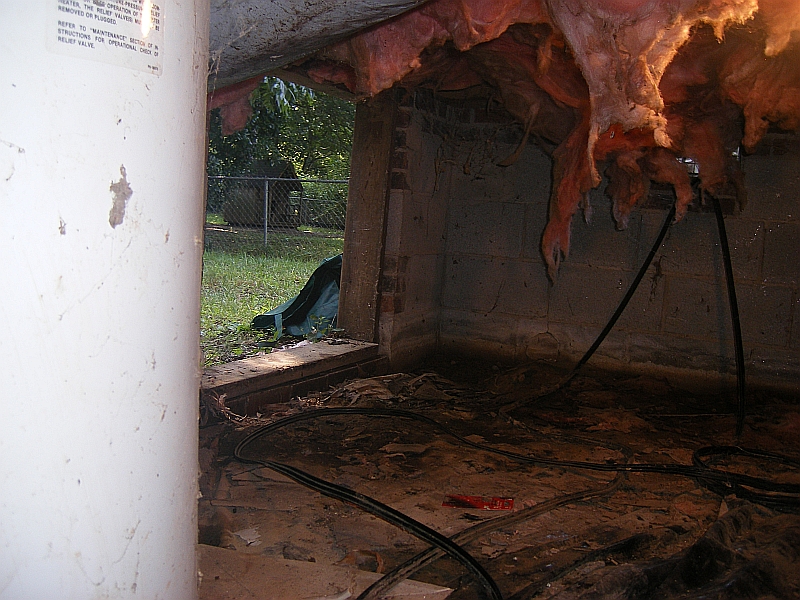
    I'd like to point out while my sister is in Spain, staring lovingly down the eyes of some guapo, sipping Porto and enjoying life.... I was here:

    Image

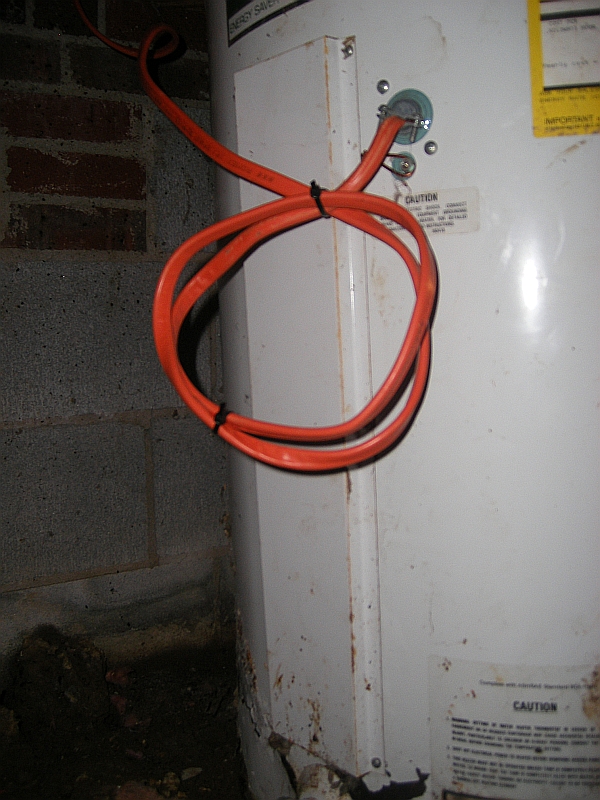
    5) With the power off it's time to remove the current wiring to the water heater. It's accessed through the panel on the water heater. Pull it through the conduit port. (not sure if that's what it's called, but that's what I'm calling it.) Once free, feed it through your new conduit box you just mounted, connect color for color to one of your new switch leads and put wire caps on it. Tighten the wire mounts inside the box (if so equipped) and seal your conduit box with the metal lid.

    Image

    6) Now strip the other line going to the switch, and feed it where the original hard-wired conduit was in the water heater, reconnecting the power to the water heater. Replace insulation and cover and finish tacking all the wires to the stud away from hot water lines, etc.

    Image

    7) Turn your breakers back on and test your switch. If you don't blow a breaker and all is good, it's time for a nice shower and several hours of brushing the insulation out of your hair. YUCK!

What I've discovered:
1) I only use the water heater for about 3 hours a day.
2) If the water heater isn't used with the switch off from the previous day it only take it about 5 minutes to come up to temperature. If it runs out, (I like to leave it off and take luke-warm eco-showers) it takes about 30 minutes to reheat.
3) At least as of right now (summer), I can forget to turn it on and take a shower in the morning with fairly hot water. Nice to know if I oversleep this fall and can't afford the 5-15 min, preheat time.
4) As a result, my family of four has saved between 200-300 Kwh per month.
User avatar
Liv
Imagine What I Believe
 
Posts: 2766
Joined: Wed Oct 05, 2005 6:59 pm
Location: Greensboro, NC

Postby A Person » Tue Jul 20, 2010 5:03 pm

I know, but it had to be said. I'll bet that 90% of work that really should have a permit doesn't. The building inspectors couldn't cope if everyone took out the permits they should
User avatar
A Person
 
Posts: 1787
Joined: Sat Nov 25, 2006 7:30 pm
Location: Slightly west of the Great White North

Postby BecauseHeLives » Tue Jul 20, 2010 5:03 pm

Get a new water heater. A 20 year-old water heater is way due to be retired and will likely fail on you at an inopportune time.
BecauseHeLives
 

Postby A Person » Tue Jul 20, 2010 5:03 pm

I think your cost is optimistic, A 240v 7500w timer will be closer to $75

Given that you want an on-demand heater, I don't know if you'll see a payback before you change it out. The savings are difficult to determine since there are too many variables

I'd put the monsy towards a new heater
User avatar
A Person
 
Posts: 1787
Joined: Sat Nov 25, 2006 7:30 pm
Location: Slightly west of the Great White North

Postby Liv » Tue Jul 20, 2010 5:03 pm

I was looking at this one here.... for $32

Honestly, I don't have the funds for replacement at this time....

but, I tried to see what the energyguides on newer models were... I didn't find a lot of information out there... and the $450 a year seemed in-line with modern equivelents on the few I've seen....

Unless you happen to know a resourse....

I went to the Dept. of Energy's website, and all they had was some crap about heat-pump water heaters coming out this year, but none are out now.... and totally voids my intentions if they're super expensive....

Apparently there isn't energy star electric water heaters....

I've got to assume that if it is the original water heater, then a $50 dollar investment in a blanket and a timer should be recouped fairly quickly, and perhaps in the next year or so I can replace it with a on-demand version....

I mean if it's still efficient as it's guide... that's about $37 a month I'm paying... and I doubt it's efficient... (apparently it hasn't been flushed in 20 years.... and I'm a bit scared to do it)....

I don't know until I try how much I save, but I've read some staggering accounts out there... perhaps they're lies... I don't know... and I suppose it's a gamble..... but if it saves me $10.00 a month... I would pay off the upgrade in 5 months.

And if I find it adequate, I could always replace it with a non-on-demand water heater down the road and keep the timer.... which would save me the wiring upgrade for the higher amp....

Whatcha think?
User avatar
Liv
Imagine What I Believe
 
Posts: 2766
Joined: Wed Oct 05, 2005 6:59 pm
Location: Greensboro, NC

Postby A Person » Tue Jul 20, 2010 5:03 pm

You could get some idea by seeing how quickly the temperature drops when you switch the heater off. Measure the temperature and then turn off the power. See what it drops to in the morning.

If you know the tank capacity you can work out the energy loss

e.g.

40 gal x 3.88 = 152 litres = 152,000 grams
60 C start temp - 50 C end temp = 10 C drop
(10 x 152,000) cal x 4.2 = 638,4000 joules
divide by 3,600,000 = 2 kwhrs

Substitute your numbers in the above and then multiply by the cost of electricity (9 c/kwhr) to see what you could save.
User avatar
A Person
 
Posts: 1787
Joined: Sat Nov 25, 2006 7:30 pm
Location: Slightly west of the Great White North

Postby BecauseHeLives » Tue Jul 20, 2010 5:03 pm

Kinda of like filling the gas tank on a 20 year old Yugo with 200,000 miles on it. Chances are you won't get to use all of the gas.
BecauseHeLives
 

Postby eddiebuckle » Tue Jul 20, 2010 5:03 pm

Liv wrote:I was looking at this one here.... for $32


Thats a single pole timer. You need DPDT for 240V.
User avatar
eddiebuckle
 
Posts: 10
Joined: Mon Apr 06, 2009 6:31 pm

Postby A Person » Tue Jul 20, 2010 5:03 pm

eddiebuckle wrote:Thats a single pole timer. You need DPDT for 240V.

You're right, which means that when if is 'off' one of the wires is still hot, the manual warns about that. I don't know if that is against code - they are selling it as a 240V switch. You would be very foolish to work on a circuit that was controlled by a timer without first switching off at the breaker. But certainly a double pole switch is safer.

It doesn't need to be a DPDT, a DPST is sufficient.
User avatar
A Person
 
Posts: 1787
Joined: Sat Nov 25, 2006 7:30 pm
Location: Slightly west of the Great White North

Postby Liv » Tue Jul 20, 2010 5:03 pm

A Person wrote:You probably need a permit for the work.


EVIL LAUGH: HA HA HA HA HA!!!

When we moved back in this house 5 years ago... (remember this is the house I grew up in with my parents) ... There was a television "lamp" cord which ran from the living room to my old bedroom.... and it was still here.... it was literally 5 extension cords with connectors plugged in to one another up under the house.... It was my old cablevision wiring....

I laughed when I saw it under there....

Back then they charged to install cable in multiple rooms (both a install fee and monthly charge) and I came up with the brainy idea of using 300ohm to coax 75 ohm conversion bits on the end of this lamp cord at both ends to splice into my parents cablevision in the living room and run it back to my room... (this is what kids do when they're poor, and they don't have drugs)

When we moved back in TWC had installed a line to that room.... I'm betting the installer laughed when they saw it...

Of course I ripped all their cheap crap out and ran high-grade contractor grade twin coax to all the rooms....
User avatar
Liv
Imagine What I Believe
 
Posts: 2766
Joined: Wed Oct 05, 2005 6:59 pm
Location: Greensboro, NC

Postby A Person » Tue Jul 20, 2010 5:03 pm

I doubt there is a plug, the heater will be hard wired.

You will need to identify the wires. The heater should have a 4 wire circuit going to it with

Bare copper - Ground
White - Neutral
Black - Line 1 (hot)
Red - Line 2 (hot)

The white wire may not be connected to anything as it is redundant, it should be terminated with a screw connector (Marrette) don't just cut it off

If you only have three wires then the bare wire will be the ground and the two other wires will both be line 1 & 2

You will need to note how the wires are connected to the heater, disconnect them and run them to the switch. You will need a short length of cable to go from the switch to the heater. This wire must be of the same capacity and type as the original wiring.

You need to position the switch and wire so that any water cannot run down the wire into the switch - i.e. leave a loop below the switch and heater connections. The wires should be secured.
Graphic1.gif


You probably need a permit for the work.
User avatar
A Person
 
Posts: 1787
Joined: Sat Nov 25, 2006 7:30 pm
Location: Slightly west of the Great White North

Postby Liv » Tue Jul 20, 2010 5:03 pm

My plan... (cough humble ignorance here)

... was to shut power down to the house...

Uplug the wiring going to the water heater, run a new set of matching cable from it and then connect them in the timer box.... accordingly....

That was my plan....

If I go with a di-pole timer then it should be fairly simple if I'm getting you right?

Meaning there's two hots, and one not.... the timer should break the two hots, and the not would continue on un-interupted....

It's basically a 110 with one extra hot lead....

?
User avatar
Liv
Imagine What I Believe
 
Posts: 2766
Joined: Wed Oct 05, 2005 6:59 pm
Location: Greensboro, NC

Postby A Person » Tue Jul 20, 2010 5:03 pm

On a 110V circuit you have one neutral wire at ground potential and one hot wire alternating +/- 120V

On a 220V circuit you have two hot wires alternating 180 degrees out of phase, each 120V from ground and 240v from each other. The neutral may or may not be present but it takes no current.

On a 110 V circuit you always switch the hot wire (single pole) so when the switch is off there are no high voltages on the device. For a 240V circuit you should switch both hot wires (double pole switch). Just switching one will break the circuit but still leave high voltages on the device.

Your power panel has two phases coming in and the breakers alternate on each phase. A 220V circuit will have two breakers on different phases and they should be coupled so that if one goes, the other does too.

Frankly if you don't know this you really shouldn't be messing with the wiring. At the very least shut down all power before starting and get someone who does know to check things out before you power it back on. You need to make sure everything is properly grounded when you have finished.
User avatar
A Person
 
Posts: 1787
Joined: Sat Nov 25, 2006 7:30 pm
Location: Slightly west of the Great White North

Postby Liv » Tue Jul 20, 2010 5:03 pm

Breakers on outside of house... on far outside of house.... I can just see myself running naked drenched in cold water- five feet from my neighbors drive-way....

Rule #1 for when Liv builds dream house on Cardiff Bay.... Breaker box on inside of house....

Nothing like hunting for a flashlight in the dark, blindly feeling your way to the side of the house in the middle of the night and trying to open a breaker box which requires a flat-heat screwdriver lined up in the exact position to open....

Thankfully we don't blow breakers too often... We did for awhile when we got the new microwave and it was on an already over-worked circuit which use to only power the stove fan prior.
User avatar
Liv
Imagine What I Believe
 
Posts: 2766
Joined: Wed Oct 05, 2005 6:59 pm
Location: Greensboro, NC

Postby Nfidel » Tue Jul 20, 2010 5:03 pm

I mean if it's still efficient as it's guide... that's about $37 a month I'm paying... and I doubt it's efficient... (apparently it hasn't been flushed in 20 years.... and I'm a bit scared to do it)....

I can't help much with this subject but will add this: I once drained my old water heater and the gunk fouled the drain valve so badly I had to install one of those cut-off nozzles that go on the end of a water hose. If you're planning on replacing the unit in the recent future, I wouldn't chance draining it. You might even break the valve trying to close it.
User avatar
Nfidel
 
Posts: 151
Joined: Sun Jul 30, 2006 4:17 am

Postby Liv » Tue Jul 20, 2010 5:03 pm

That's sort of the philosophy I'm working under... "if it ain't broke... don't fix it."
User avatar
Liv
Imagine What I Believe
 
Posts: 2766
Joined: Wed Oct 05, 2005 6:59 pm
Location: Greensboro, NC

Postby mwooldri » Tue Jul 20, 2010 5:03 pm

there is the ultra-cheap way to control the hot water costs.

Most breaker boards would have a separate circuit for the water heater. Just turn it on and off there manually.

Probably those breakers weren't meant to be turned on and off like crazy but still... it would work for a short time. Snag with this is that you forget to turn it off and waste electric, or turn it on and have a few cold showers.
mwooldri
 

Postby Liv » Tue Jul 20, 2010 5:05 pm

So I finally got around to this project. I'm a little bit more informed now then when I originally wrote this after a full disassembly of my 220 dryer... so.....

Instead of a timer I did go with a switch. With me going to school this fall, we needed to save as much as possible... So I found a 220 DPST switch at Home Depot for $10, and then purchased a roll of electrical chord with the correct amperage rating for $29. Electrical box to mount the switch, and a cover is all that was left.

Drilled out the wall above the water heater and down through the floor and fed the wires through. Wired one side to the water heater, disconnected the current cable, and connected that to the other side.

I still need to get a conduit box for under the house where the two wires meet, but all is working well. I'll post back once I know how well this works, but I can tell you the week we were in Brussels I did an experiment by shutting it off and saved $30 on my power bill. (of course we weren't here for other stuff either, but we shall see)
User avatar
Liv
Imagine What I Believe
 
Posts: 2766
Joined: Wed Oct 05, 2005 6:59 pm
Location: Greensboro, NC

Postby A Person » Tue Jul 20, 2010 5:05 pm

My mother just called and asked me to install a timer on her hot water heater when I next visit so I did the math and reckon she'll save about $17/month by heating her water in the cheap overnight rate

Home depot has a suitable timer for $38

They look a bit complicated with 8 cryptically labelled terminals but it's not bad. You have to run power to the timer itself and it's a double pole switch - each switch accounting for three terminals (NC, NO & COM)

The best way to wire it is to take the power to the timer terminals and make jumpers to connect the timer terminals to the COM terminals. The lines to the heater are then connected to the NO terminals

This is the typical 240v setup. There are dip switches that set the voltage for the timer

GE timer.gif
GE timer.gif (10.4 KiB) Viewed 7050 times
User avatar
A Person
 
Posts: 1787
Joined: Sat Nov 25, 2006 7:30 pm
Location: Slightly west of the Great White North

Postby A Person » Tue Jul 20, 2010 5:05 pm

It's certainly more code than leaving a cable splice exposed :lol:

As long as there is access to the box, the box is grounded, has a cover and the cables stapled down it should be OK


It's easy to go overboard with these things. Your switch is cheap and effective
User avatar
A Person
 
Posts: 1787
Joined: Sat Nov 25, 2006 7:30 pm
Location: Slightly west of the Great White North

Postby A Person » Tue Jul 20, 2010 5:05 pm

If you want to get fancy you can install a 110v activated DPST contactor near the heater and then you can mount a pretty timer switch in place of your switch

watertimerremote.gif


The contactor should be something like a Seimens 45EG20AF ($28) or Honeywell DP2030B1002 You'll need anl electrical box ($11) to install it in

The timer can then be a pretty one like this one from Home depot ($20) that fits in a standard electrical box
User avatar
A Person
 
Posts: 1787
Joined: Sat Nov 25, 2006 7:30 pm
Location: Slightly west of the Great White North

Postby Liv » Tue Jul 20, 2010 5:05 pm

Well last couple days we've been using the switch I've discovered how little we actually need to turn on the heater. If we turn it on at night for about 15 minutes it's fully hot. We do dishes, clothes and showers then shut it off (about 2 hours) There's still plenty of hot water even in the morning if we don't turn it back on. If we do turn it on... (usually because I like to shower in the morning) it's on for another 30-45 minutes. So all together the water heater is on about 3-4 hours a day instead of 24 hours. The water never seems to get cold... unless you run out the tank without the switch on...

I suspect I'll see a massive difference in the power bills... especially for a couple reasons...

1) when I went into wire the switch, and pulled the panel, the temperature was set to 140F (which makes sense because our dishwasher doesn't have a heater).

2) This is a 22 year old water heater that's never been flushed. Its original energy rating was $450 a year, and I suspect it's not nearly as efficient anymore.

3) This water heater is in the crawl space, which as I discovered... even when it's 90F out.. was rather cool and cold. I imagine during the winder it's much, much colder.

I'm really excited to see how much I'll actually save. The timer seemed like a good idea originally and wouldn't have required me to install a switch but it also meant the timer was below the house as well which meant it couldn't be manually controlled and I'd be stuck with a program that was least likely to interfere with a changing schedule. Since I took the cheap route and ran the switch with a minimal amount of cable, (basically right above where it is in our room) then I'm getting the best of both worlds. If this truly is cost efficient, at a later date I might invest more money into locating the switch to the bathroom, or utility closet. But that would have cost me about $100 worth of cable not to mention those rooms had been recently painted and I didn't want to cut through the drywall. This works well. The switch is right on the wall in our room, and when I go to bed at night I can check it to make sure it's off.
User avatar
Liv
Imagine What I Believe
 
Posts: 2766
Joined: Wed Oct 05, 2005 6:59 pm
Location: Greensboro, NC

Postby Liv » Tue Jul 20, 2010 5:05 pm

I actually thought about doing something like that with one of those timers you turn and they count down... I only found them in 110, so I consider using a contactor like the one I installed on the HVAC...

...and I might down the road.... but $30 is about my limit right now... as I've got a $900 school bill not including books and the Pell Grant hasn't been approved yet....

I do need to buy a small conduit box as we're about to have the house inspected and I'd hate for them to flip to see the old power line simply connected to the new line with the wire nuts....

I'll pick up a conduit box and mount it on the floor joist so everything looks up to code. (Which I assume that is code.)
User avatar
Liv
Imagine What I Believe
 
Posts: 2766
Joined: Wed Oct 05, 2005 6:59 pm
Location: Greensboro, NC

Postby Liv » Tue Jul 20, 2010 5:05 pm

It was just one of those things I forgot....

I thought there might be room to make all the connections in the control panel of the water heater but there's barely enough space to get the single line in... I'll try to get pictures next time I'm under there.... it's taking me two days to get the cobwebs out of my hair...
User avatar
Liv
Imagine What I Believe
 
Posts: 2766
Joined: Wed Oct 05, 2005 6:59 pm
Location: Greensboro, NC

Postby Liv » Thu Sep 23, 2010 12:58 pm

Well the verdict is in... after doing the math, and comparing the last average temperature month and breaking it down by day to get an equal comparison.

I came up with a 235 KWH difference.

Now the kids were out of school then, but the lights are all motion sensitive fluorescent and the only thing they used that would have likely resulted in more power is the tv in their rooms. Even if they used it for 12 hours a day, we're talking a max of 60 Kwh leaving 190kwh difference. I don't think they watched that much tv.

So apparently... this modification is highly beneficial.

If it saved 200 Kwh, that means at my .11 cent rate- I saved $22 for the month. Not bad.
User avatar
Liv
Imagine What I Believe
 
Posts: 2766
Joined: Wed Oct 05, 2005 6:59 pm
Location: Greensboro, NC

Next

Return to Originals